Mobile App Overview
Location, Location, Location

We know that being able to move around in the app is important so we've changed things to incorporate a new side menu. It still contains the links to schedule showings, check your feedback, manage your listings, and view your listing activity report.
Also, you will see a few new items:
- Appointment Statuses
- Yellow: Requested Appointments
- Green: Confirmed Appointments
- Red: Cancelled/Declined Appointments
- Notification Badges
- See how many new items need your attention
- Feedback Badges
- On your listings or those needing your input
Accessing your profile and adjusting your settings is handled at the bottom of the menu.
Scheduling Appointments
The new scheduling screen layout is built to save you time.
You can see the times you already have other appointments, showing instructions, access details, and even send a note to the listing agent.

Step 1
Search for a listing, choose a recent one, or schedule on your listing.
Step 2
You can select an existing buyer, add a new buyer, or choose not to attach a buyer to this appointment.

Step 3
Adjust your contact preferences, add a note, or select the appointment time.
Step 4
You can use the calendar to schedule for any date. If you have existing appointments, they will be visible on this screen.
You can also adjust the length of the appointment.

Step 5
Submit your request by clicking the Request Appointment button.
You will be notified that the request has been sent before seeing the appointment details screen.

The Appointment Detail screen will show you Appointment Actions such as reschedule or cancel and Access information.

The listing agent's contact information is also available.
From this view you can:
- View the map to get an idea of where the listing is
- Get directions
- Add the appointment to your calendar
Our staff is also available should you have any questions.
Notification Center: Handling Notifications
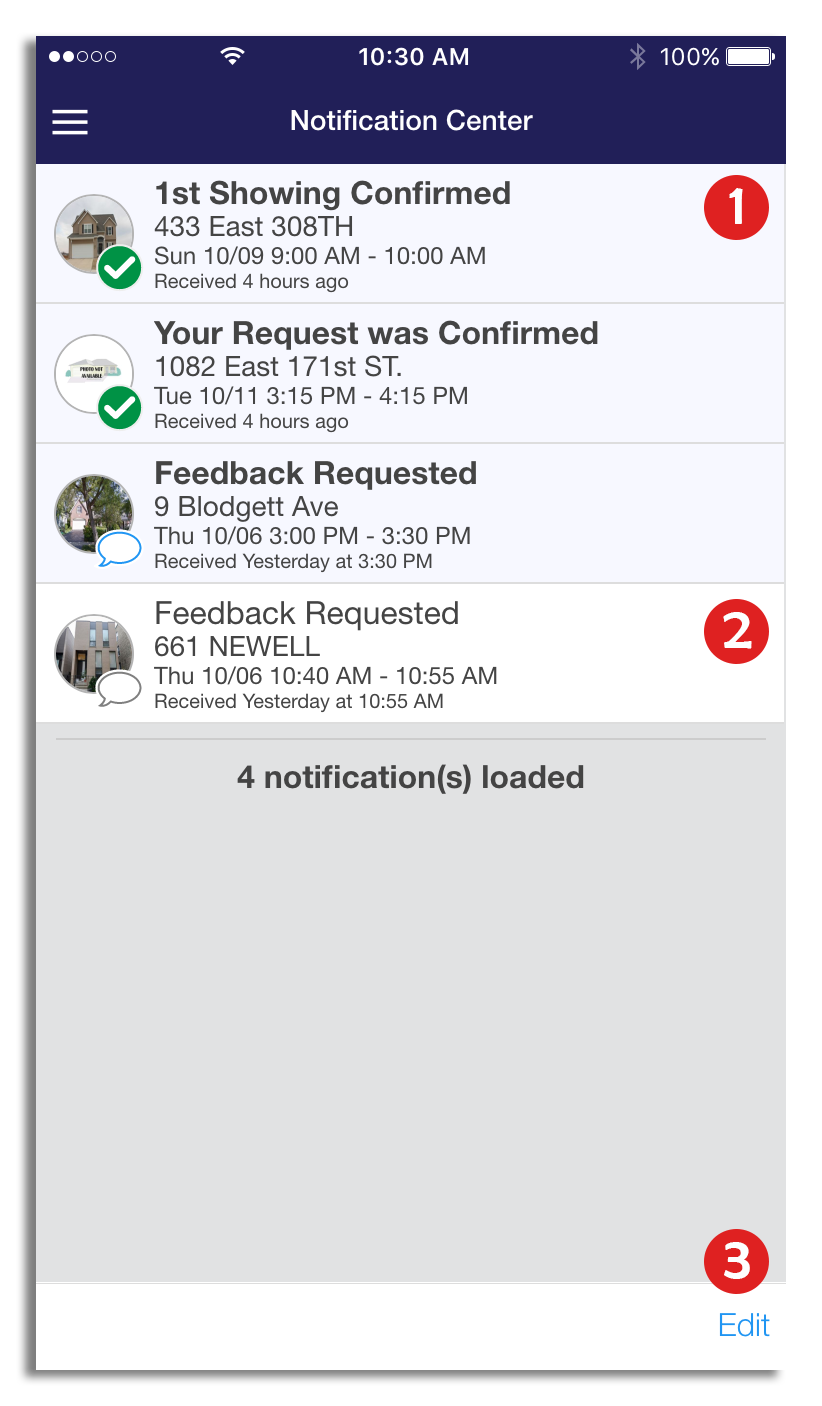
Removing notifications from the Notification Center will allow you to remove notifications no longer needed. Once removed, these notifications will not appear again for that appointment unless the appointment status has changed.
#1: The light blue background indicates a new notification.
#2: The white background color indicates a notification that has been read.
#3: The edit button will always be at the bottom of the notification center should you need to delete one or more notifications.
Different types of notifications can be present in this list. Each will have a different status icon and wording.
A few you may see are:
Notifications that are read will not be counted on the application's badge.

#1: The light blue background indicates a new notification.
#2: The white background color indicates a notification that has been read.
#3: The edit button will always be at the bottom of the notification center should you need to delete one or more notifications.
Different types of notifications can be present in this list. Each will have a different status icon and wording.
A few you may see are:
- Broadcast messages
- Feedback Requests
- Feedback Receipts
- Showing Notifications
Notifications that are read will not be counted on the application's badge.

Mark Read
In order to keep all notifications but update the notification count. You can select one or more notifications with the check-boxes on the left and then choose the Mark Read button on the left side of the menu.
Delete
In order to remove individual notifications select the notifications that are not needed anymore choose the Delete button in the middle of the menu. Remember, you are deleting notifications only. It will not affect actual appointments and feedback.
In order to remove individual notifications select the notifications that are not needed anymore choose the Delete button in the middle of the menu. Remember, you are deleting notifications only. It will not affect actual appointments and feedback.
Cancel
You can always cancel your selection(s) and leave the "Edit" screen.
You can always cancel your selection(s) and leave the "Edit" screen.

Feedback Overview
Feedback or remarks about a listing are invaluable tools that a listing agent can provide to the owner. Not only can they be used to subtly hint at the things that people don't like, but can also influence small changes that mean the difference between one more week on the market and a signed contract.
Accessible from the slide-out menu, the new feedback screen shows you the difference between those that are new (in blue) and those that you are still waiting for a response on. You can search for a particular address or by listing id to narrow down the list. In the title bar of these feedback cards, a user will be able to see the text which shows the up-to-date status.
Accessible from the slide-out menu, the new feedback screen shows you the difference between those that are new (in blue) and those that you are still waiting for a response on. You can search for a particular address or by listing id to narrow down the list. In the title bar of these feedback cards, a user will be able to see the text which shows the up-to-date status.
- New Feedback – Submitted by the buyer's agent but not yet viewed by you the listing agent
- Waiting for Response – The buyer's agent has not yet filled out the questionnaire.
- Viewed – The buyer's agent has submitted it and you (the listing agent) has viewed it. What remains is to publish it for your homeowner.
Please Note: It is possible to have both of these titles in the top bar if the listing has had multiple appointments on it. Each card will also show you the status of the property, the price, the number of beds and bathrooms, and the buyer's name if you added it.
.
.
Viewing Submitted Feedback (Listing Agent)
Feedback can easily be accessed after the feedback has been submitted via the notification from the notification center. If you are trying to access the feedback after the notification has been dismissed then follow the steps below.
Step 1

From the home screen, open the side menu and tap On My Listings, underneath the Feedback section.
Step 2

A blue card indicates that feedback has been submitted. A gray card will indicate that you are waiting for a response from the buyer's agent.
Tap on the feedback you would like to view.
Step 3

Review the feedback provided.
Share and Publish

Feedback can easily be managed and sent to the owner from this section. Under Feedback Actions, an agent can publish the feedback to homeowners.
A copy of the feedback can also be forwarded to any homeowner associated with the listing or any other contact. Immediately above the responses to the questions you asked, the status of the feedback will be shown. Additional information, such as the original appointment details and history can be seen near the bottom of the page.
Submitting Feedback (Buyer's Agent)
Step 1

You will receive a feedback request via push notification or email.
If a push notification has been received, tap on the notification from the Notification Center.

If an email has been received, then tap on the Click to Give Feedback button.
Step 2

Complete the Feedback Form.
Tap on Submit when completed
Step 3

A notification will appear letting you know that you have submitted your feedback successfully. Tap on OK to close the window