Matrix One Pager
ShowingTime for the MLS lets members schedule showings 24/7 from the MLS website.
Benefits include:
- 24/7 online access to request showings
- Delivers requests immediately to listing representatives
- Reduces/eliminates showing-related calls, phone tag
- Generates feedback for listing agents/sellers (upgrade also available)
- Accessible via the ShowingTime Mobile App (in some markets)
- Enables buyer's agents to control their schedules
- Eliminates surprises by displaying showing instructions
- Monthly reports for MLS managers with trend data, comparative statistics
- And helps sell homes more efficiently
Accessing Showingtime
Step 1
Start off by navigating to the External Links section on the Home Screen. Then select ShowingTime Agent Configuration from the list of options.
Step 2
You should now be authenticated into the ShowingTime system. We recommend that you start off by updating your Profile, your Showing Instructions, and lastly your Feedback settings.
Alternate Method
Step 1
Start off by selecting the Links menu option on the Home Screen.
Step 2
Under the section labeled Manage ShowingAssist you will have a single link, Manage My ShowingAssist. Select that from the list.
Step 3
You should now be authenticated into the ShowingTime system. We recommend that you start off by updating your Profile, your Showing Instructions, and lastly your Feedback settings.
Listing Worksheet
Feedback
(If you're not in the ShowingTime system, make sure that a new tab or window hasn't been opened. If you have checked and still haven't been authenticated into the ShowingTime system then make sure that you have allowed popups from within your browser.)
Scheduling
Step 1
Start off by hovering over or selecting Search from the top or side navigation bar.
Step 2
Select from one of the search methods provided to find the listing for which you would like to schedule a showing.
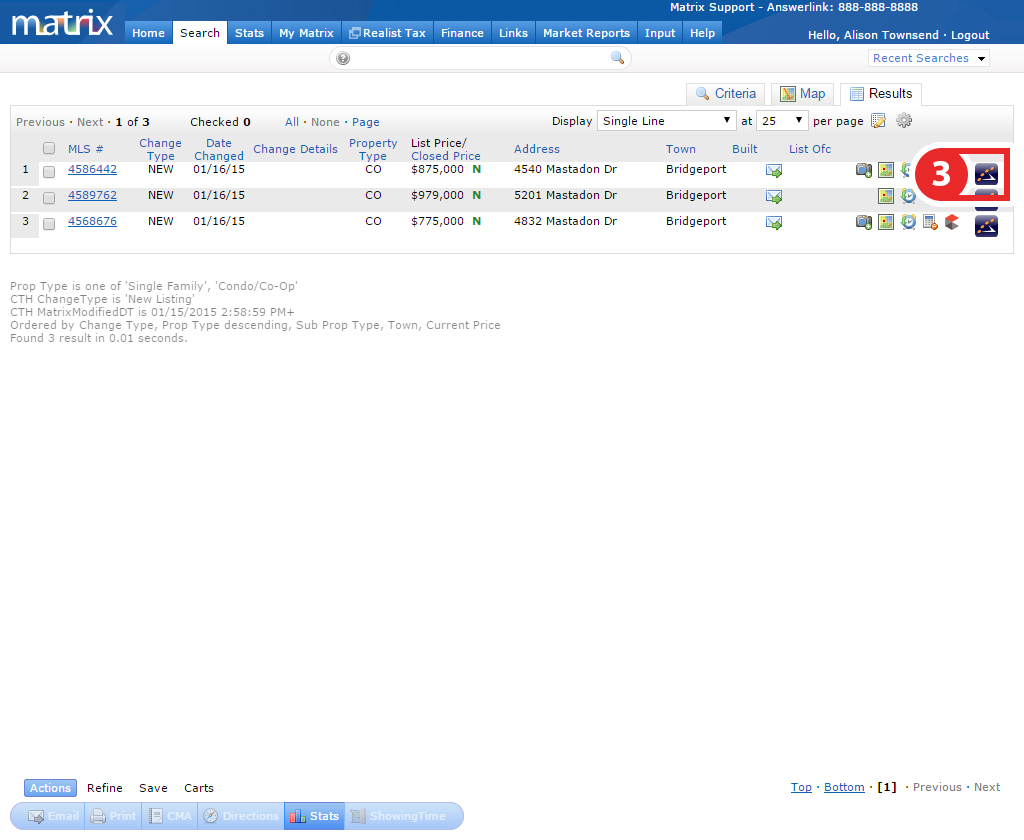
Step 3 (From the Single Line View)
You can select the
Step 3 (From the Agent Full View)
Underneath or adjacent to the listing photo you will need to click on the Schedule a Showing button.
Step 4
You should now be looking at the ShowingTime scheduling interface. From here you can schedule in two ways:
- As a Single Showing
- Using ShowingCart
Learn More: Scheduling > ShowingCart
(If you don't see the scheduling interface, make sure that a new tab or window hasn't been opened. If you have checked and the scheduling interface still hasn't opened then make sure that you have allowed popups from within your browser.)
ShowingTime will refresh this information regularly when updates are made. Please contact support@showingtime.com with any questions on the integration in your MLS.
For Yourself
ShowingTime has made it simple and easy to schedule a showing through your MLS following the steps below.
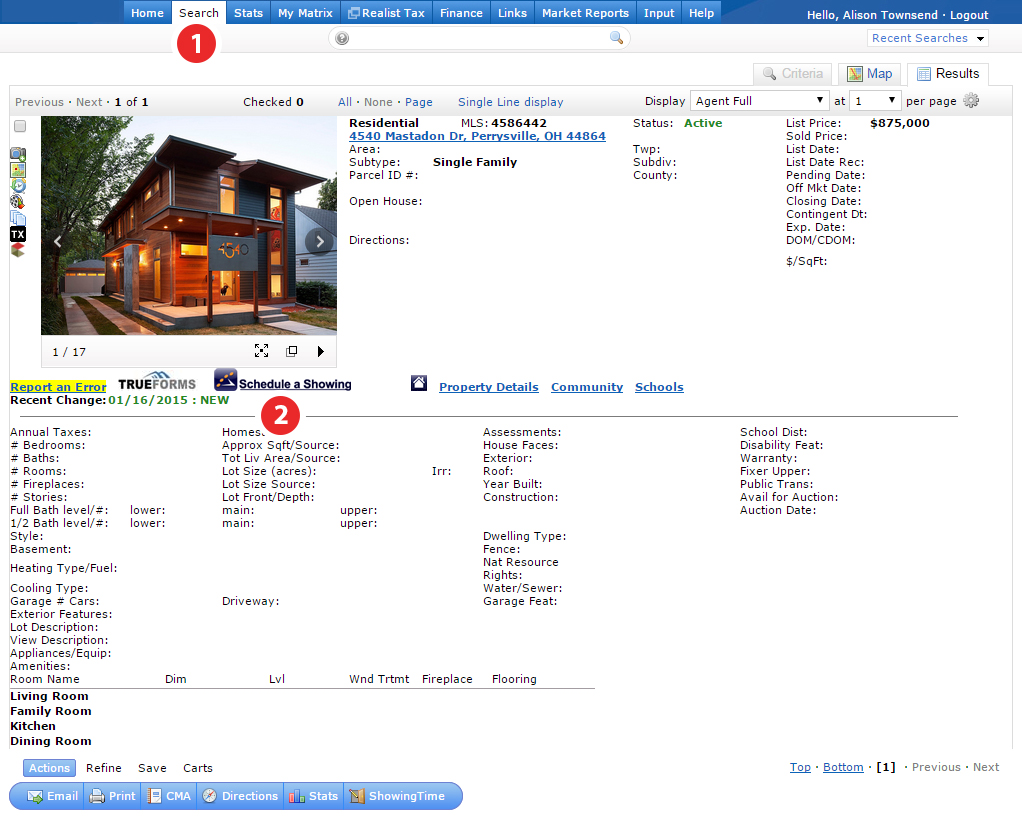
Step 1
Login to your MLS and find the listing you would like to make a request on
Step 2
Click on the Schedule a Showing link, which will take you to ShowingTime's scheduling screen
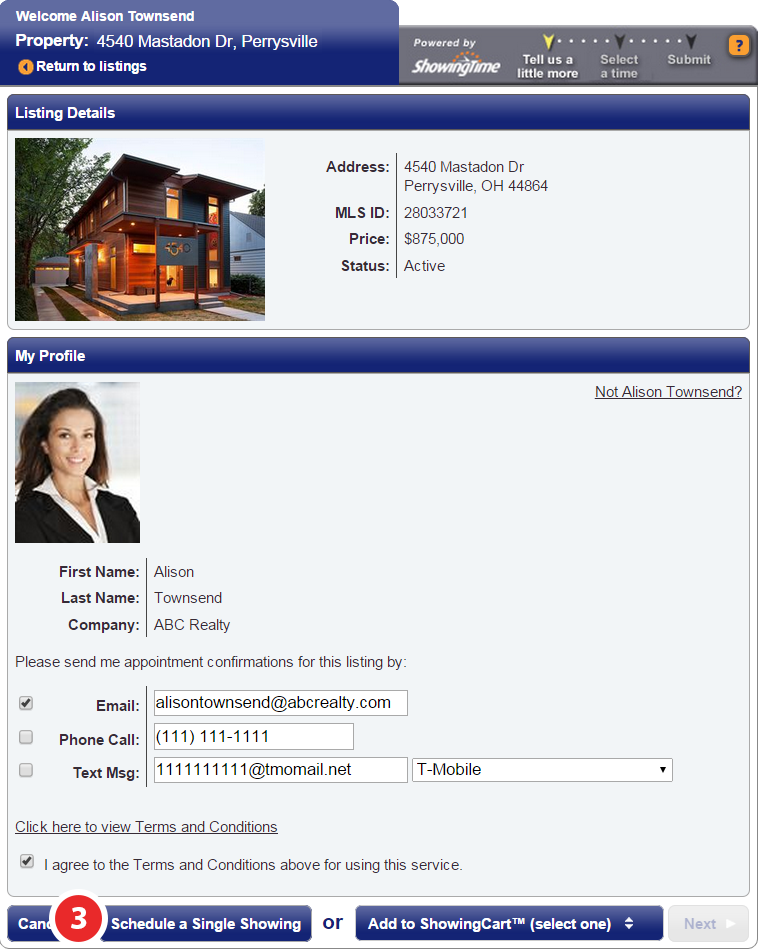
Step 3
Review the listing details and your confirmation preferences, then click Schedule a Single Showing
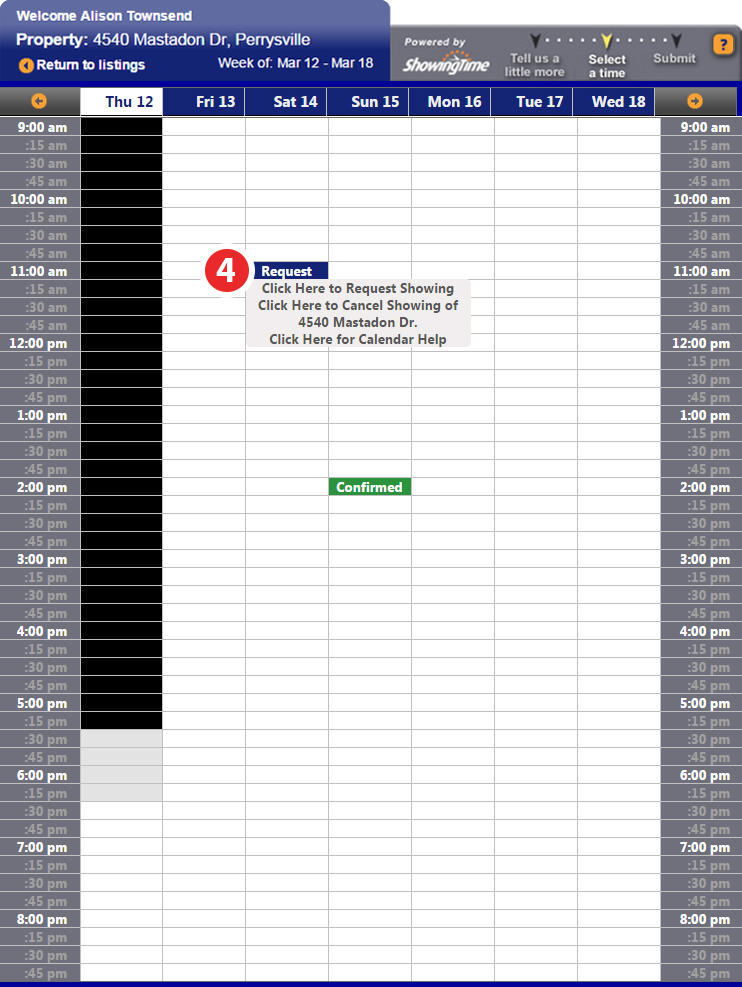
Step 4
Select the date and time slot you would like to request
- White is available
- Gray is 'Suggested Lead Time'
- Black is any time that is unavailable, including 'Required lead Time', 'Showing Restrictions', and time that is in the past
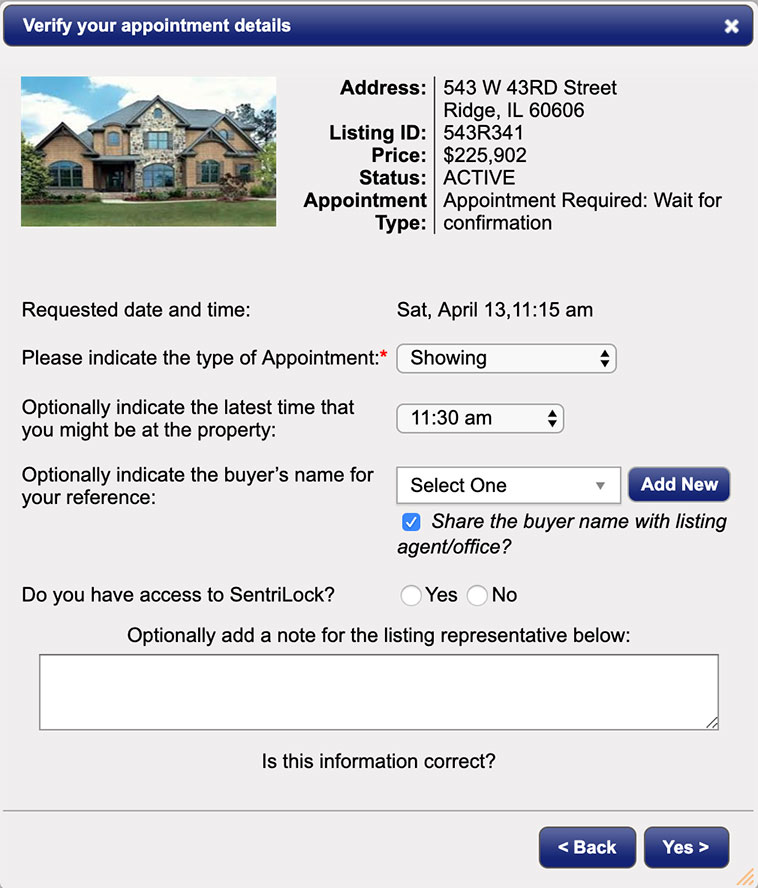
Step 5
Verify your appointment details, then click Yes
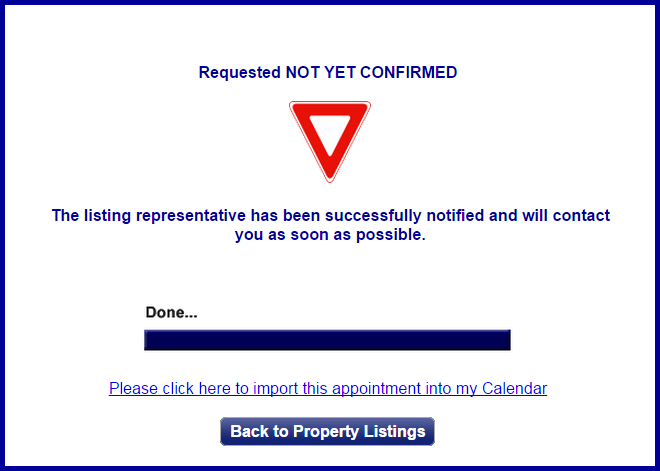
Populates when the appointment requires confirmation from any/all contacts
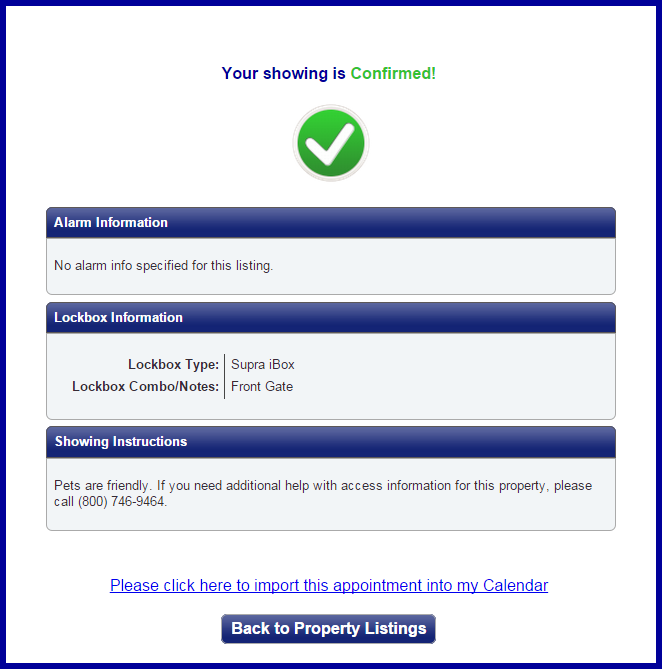
Populates when the appointment does not require confirmation
On Behalf of Another Agent
If you need to log an appointment that was not made using the traditional scheduling avenues, this will show you how to log an appointment and what options are available to you by doing so.
Profile Basics
This section contains your contact information and various account level specifics, updates here will filter down to your listing level contact details for all future appointments.

Listing Agent Preferences

Showing Agent Preferences

Messaging Preferences
These settings control how you prefer to be notified when an agent or listing contact messages you through ShowingTimes messaging system.
 ShowingTime Messaging
Mobile App Access

Appointment Download Service Key
This section is used for customers who are provided ShowingTime as a service by their MLS through our ShowingTime for the MLS service. If your company is using another online scheduling company and appointments need to be forwarded to them, this is where we would add a service key so our system knows not to handle the appointment for you. Removing this key will allow ShowingTime to then again handle appointments going forward.

System Information
This section contains information on when your profile was last updated and by whom.

The Listing Worksheet
The Listing Worksheet is the main driver for showing. Without basic showing instructions, showings cannot take place. When a listing worksheet has been properly configured it requires minimal updates and provides a solid basis for how showings will take place.


Allow Showing Agents to Request Appts Online?
This switch controls any & all forms of online scheduling, including appointment scheduling through the MLS and any 3rd party integrations.
Related Page: 3rd Party Integration

Appointment Type
- Appointment Required
Permission must be obtained from ANY of the designated listing contacts (Owner(s)/ Occupant(s)/ Listing Agent(s)) before the appointment request can be confirmed. Typically used for occupied homes. - Courtesy Call or Go and Show
Appointment requests are documented and immediately confirmed. Typically used for vacant homes on lockbox. - View Instructions Only
The buyer's agent will immediately see any notes provided by the listing agent. The buyer's agent will not be given a calendar to select an appointment date & time.
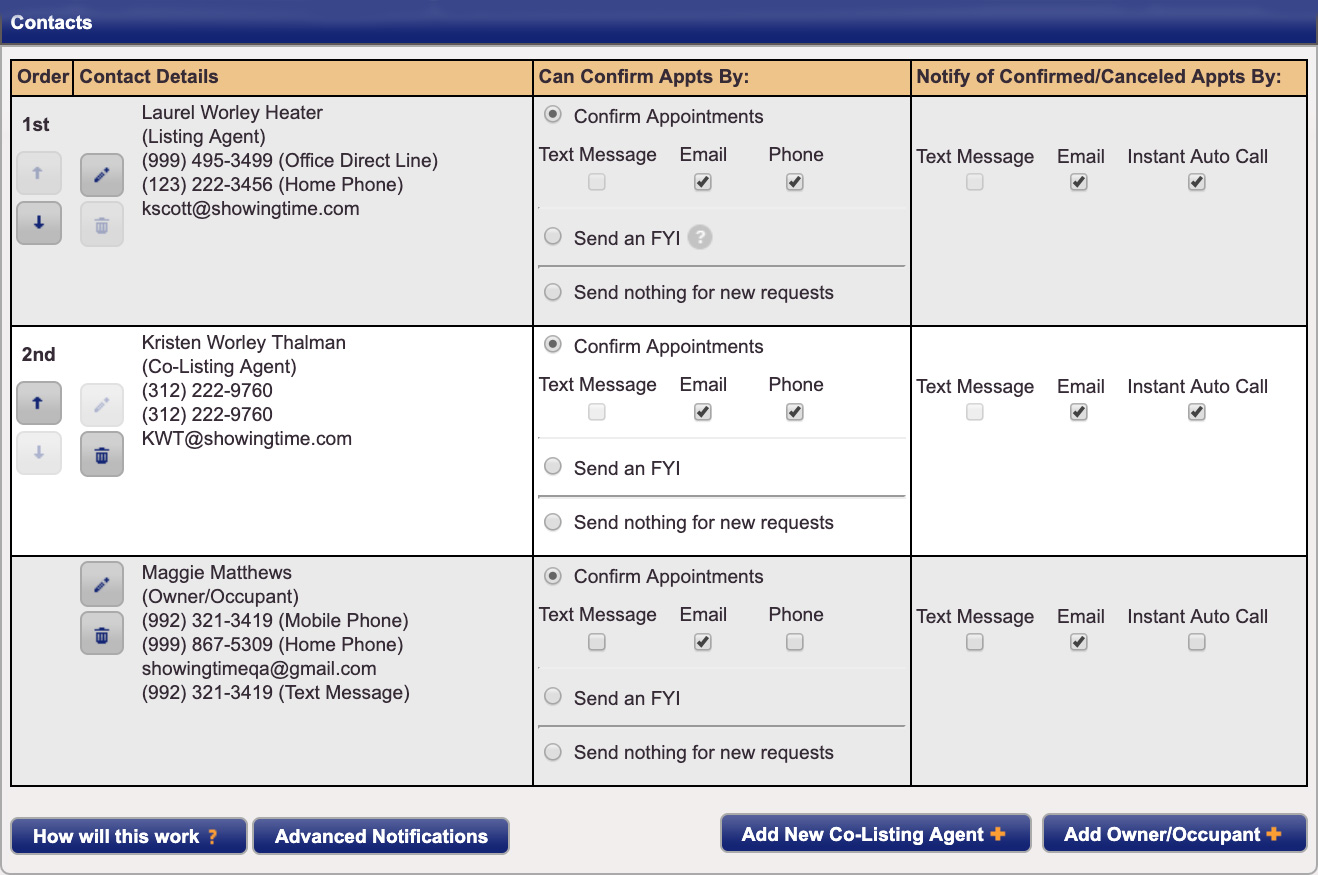
Buttons


Can Confirm Appts By
This section allows you to configure any contacts method of notification when appointments are scheduled. This option is only available when the appointment type Appointment Required is selected.
Notify of Confirmed/Cancelled Appts By
This section allows you to configure any contacts method of notification when appointments have been confirmed or cancelled.
Related Page: Listing Worksheet > Contact Methods & Management
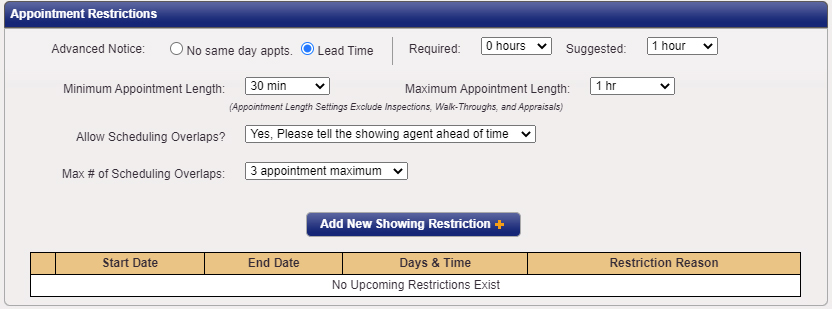
Advanced Notice
Appointments cannot be scheduled on the same day. This is the ideal solution for tenant occupied listings or for instances where there needs to be previous day notice for appointments.
Required is a lead time which will prevent appointments from being scheduled if the requested appointment falls within that lead time.
Suggested is a lead time which will allow appointments to be scheduled, agents scheduling will be notified that the owner or occupant prefers the time set but it will not inhibit appointments from being requested if the requested time falls within that lead time.
Maximum Appointment Window that you would like agents to schedule. Please be aware that if the option has been set to None, agents will be open to schedule appointments which may seem abnormally long as agents view the length of the appointments in two ways, as a time frame for a showing or as an appointment arrival window.
Allow Overlapping Appointments
You have 3 options to choose from:
- Yes, No need to inform the showing agents
- Yes, Please tell the showing agent ahead of time
- No, exclusive showings only
Please go to the section below for more information.
Related Page: Listing Worksheet > Showing Restrictions

Access & Alarm information will only be provided to agents when an appointment has been confirmed or if the appointment type has been set to View Instructions Only.
Access Details- Options populated are specific to the access type selected.
Related Page: Listing Worksheet > Access Types
- Alarm Disarm Code
The code needed to disarm the alarm system. Even if the disarm code is the same as the arm code please add it here. - Alarm Arm Code
The code needed to arm the alarm system. Even if the arm code is the same as the disarm code please add it here. If no code has been added agents will assume that they don't need to rearm the alarm system when leaving. - Alarm Passcode
The verbal code needed in-case of accidental alarm tripping. - Alarm Notes
Usually used for location of the Alarm or any specific instructions pertaining to the alarm system.

Notes for Showing Agent
Any notes that you would like provided to the buyer's agent "after" the appointment has been confirmed or provided automatically if the appointment type View Instructions Only has been selected.
Add From Predefined Notes
A selection of commonly used notes, ranging from notes about showing restrictions, appointment windows or notice and notes associated with pets, access information, or general listing information. Notes can easily be added by selecting the checkbox next to the note. Once all needed notes have been toggled click on Add to populate the notes to that desired section.
Settings Side Menu
The left side of the Listing Worksheet consists of your listing photo, listing basics, and commonly used tools for your listing.


Listing Photos are imported from the MLS. You will be presented 2 buttons located on the bottom right corner of your listing photo.
- For changing your photo
- For deleting your photo
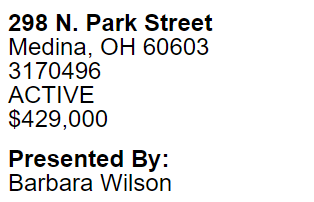
Below that you will have listing basics, which includes the listings address, MLS number, MLS status, and price.


Related Page: Reports > Listing Activity Report


Related Page: Listing Worksheet > Attachments
Showing Restrictions and Rules
As most sellers and agent schedules vary from day to day due to work, vacations, or even a simple doctor's appointment, ShowingTime provides a way for agents to create appointment restrictions for specific days and/or times which differ from the day to day standard ones. This is known as Setting an Appointment Rule, or anything that will change the normal outcome for confirming showings based on preferences set on a listing's instruction worksheet.
Creating a Showing Restriction
Showing Restrictions can be created and managed in two places on the Listing Worksheet:

Under the Appointment Restrictions section, which will display in a list view.

On the Showing Restrictions tab, which will be organized in a calendar view, allowing you to dynamically see restrictions set in place by day, week, or month.
Step 1
Click Add New Showing Restriction
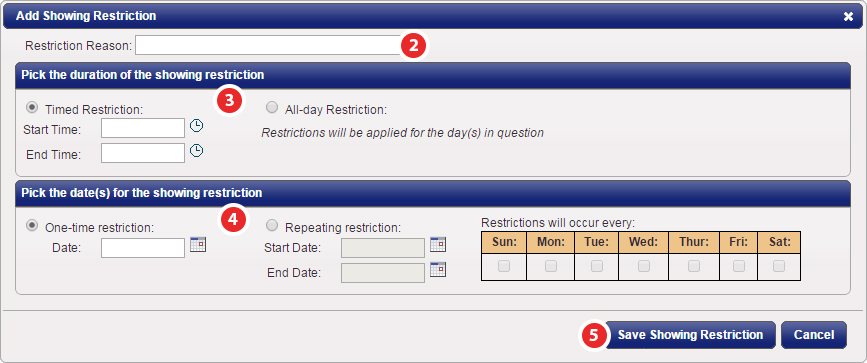
Step 2
Add a Restriction Reason
Step 3
Choose the duration of your rule, Timed or All-day
Step 4
Choose the rule date duration, One-time or
Step 5
Click the Save Showing Restriction button to apply your rule
Basic Layout & Calendar Views
Calendar View Options

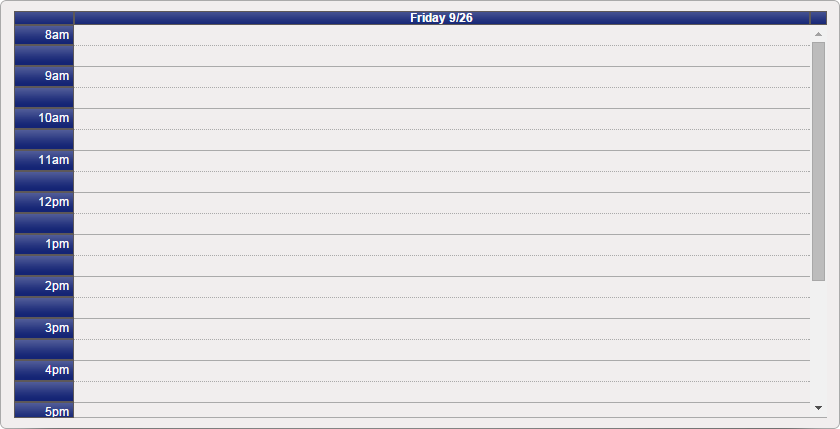
Located at the top of the Restrictions tab are the Calendar View Options. This includes options to change the view depending on your needs. There is also a button to add a rule, as well as options to change specific days, weeks, or months depending on your view selection
Month View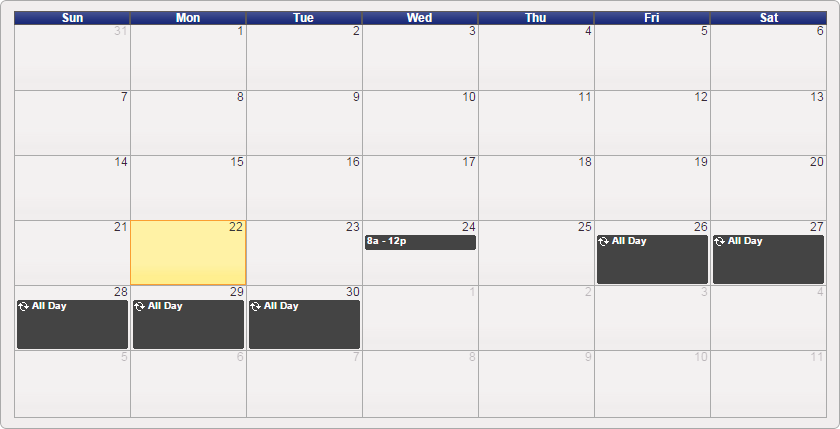
Week View
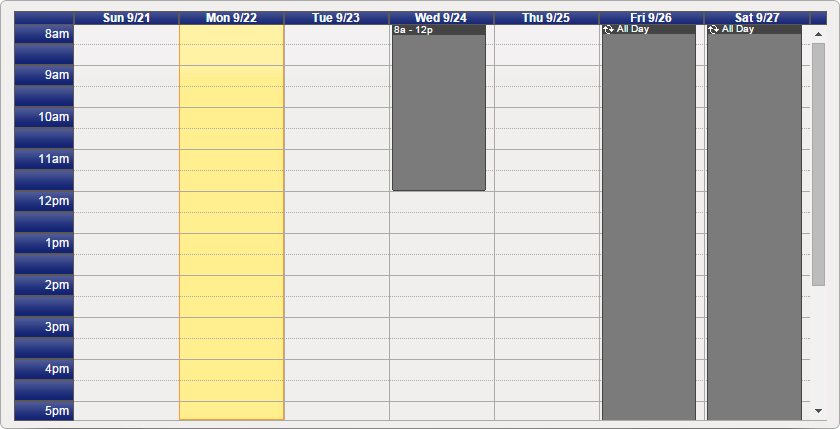
Day View
List View

List View is the only view that will be shown at all times. The list view will help show specific details about any rules set on a listing. This view will only populate rules that are for today, or in the future, past rules will be removed from this view.
Adding Attachments to your Listing
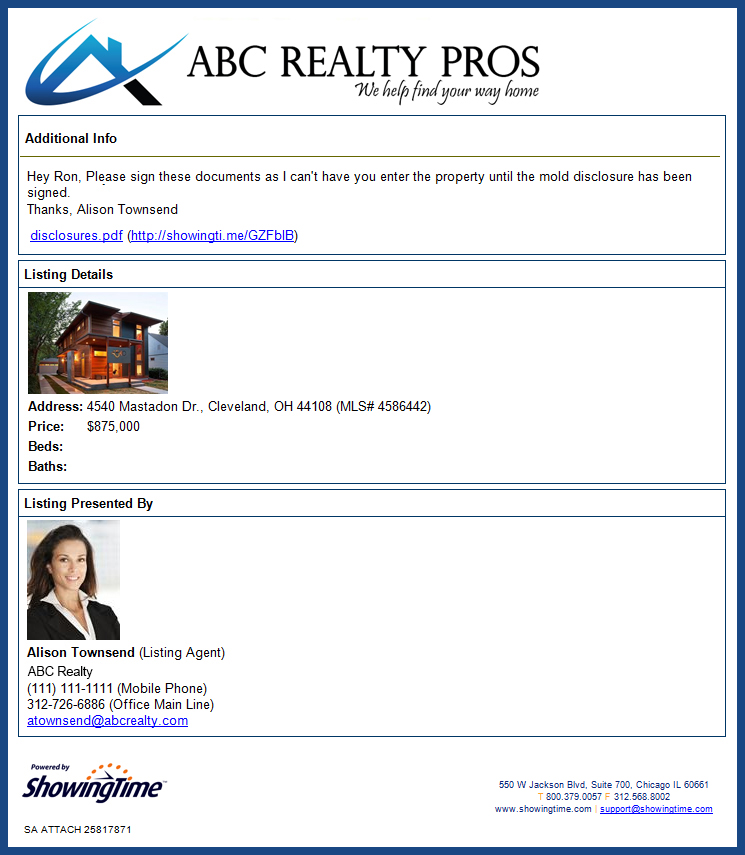
Agents often need specific disclosures signed before potential buyers can see a listing, or sometimes agents want to show the floor plan of a listing or attach more photos. This is often a tedious process - you have to find the buyer's agent's email address, find the documents or photos to attach, then send the email. ShowingTime has automated this process by allowing agents to easily attach documents or photos. Every time an agent schedules on that listing, they will automatically be emailed those documents.
Getting Started
ShowingTime enables you to attach multiple documents if needed. Attachments must be in .PDF, .JPG, .GIF or .PNG formats (20MB max per file).

Start by selecting Listing Setup from the side menu.
Then select Listing Setup from the sub-menu.
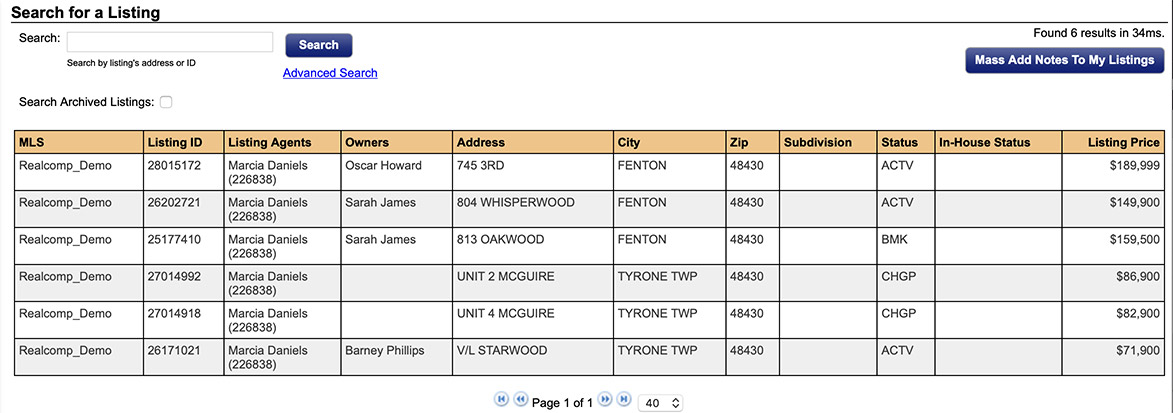
Find the listing you want to update with attachments.

On the left side of the listing worksheet, underneath your listing's photo, select Attachments.
From the sub-menu, select Add / Remove.

Step 6
Select Choose File.

Step 7
Navigate to find the file you want to attach.

Step 8
Attached documents will be uploaded once selected.
If a document needs to be removed, click on the orange X next to that item.

Step 9
When finished click Done. Now each time an agent schedules on this listing, your attachments will be sent automatically.
Manually Sending a Document

Step 1
Select the Send In Email sub-menu option from the Attachments menu.
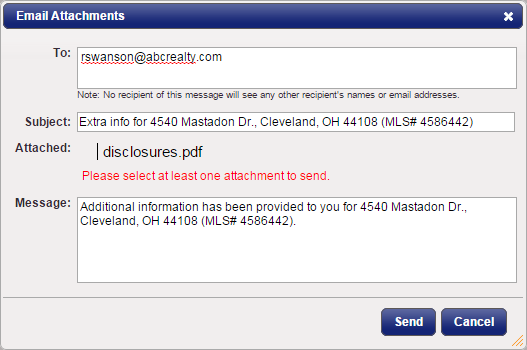
Step 2
Enter the agent email address where you want to send the attachments.
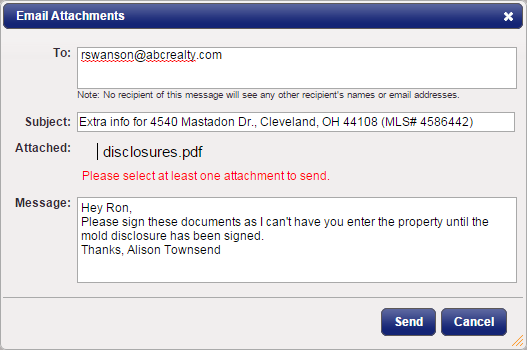
Step 3
Edit the Subject and Message fields if desired.
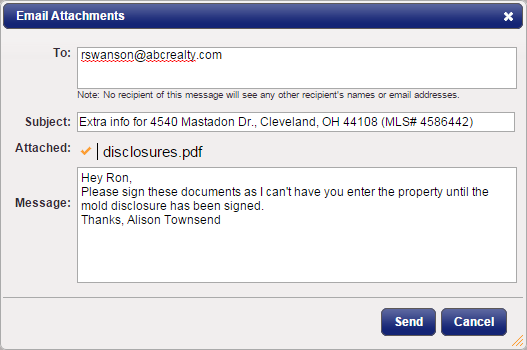
Step 4
All attachments with a checkmark next to them will be sent in this email.
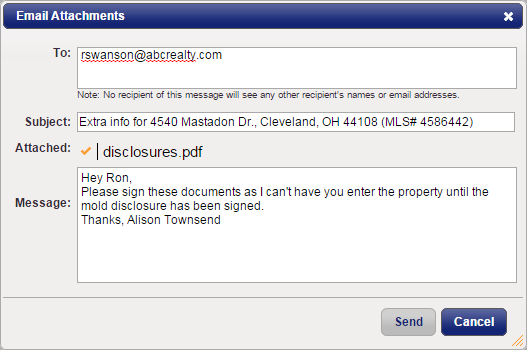
Step 5
Click Send.
Advanced Notifications
As a listing agent, you can set up 'Advanced Notifications' or 'Rescue Notifications' to help prevent owners from cancelling showing requests, or to inform you when a showing is in danger of not taking place due to not being confirmed.
Getting Started
Start by selecting Listing Setup from the side menu.
Then select Listing Setup from the sub-menu.
Select the Listing you want to configure advanced notifications on.
Step 4
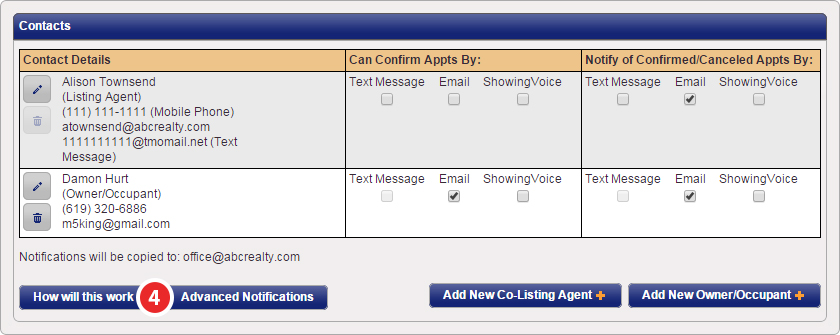
Under the Contacts section, click the Advanced Notifications button; from here you can configure either of the notification methods. (Escalations & Appointment Moderation)
Advanced Notifications are defaulted to No, but are easily configured by selecting the Yes option next to either of the advanced notification methods, then choosing the preferred method of contact (Text Message, Email or Automated Phone Call, known as ShowingVoice).

Escalations
A request can be escalated when a showing is in danger of not taking place due to not being confirmed. Escalated Appointments will notify a contact so they can confirm the appointment. Escalation times can vary depending on when the appointment was originally scheduled & how much lead time has been provided, as outlined below.
- Appointments scheduled on the same day as the request
- These appointments will be escalated anywhere between immediately to 2 hrs. before the appointment's start time.
- Appointments scheduled with prior-day or more notice
- These appointments will be escalated anywhere between 2 hrs. before the appointment's start time to 7 PM the prior day.
Appointment Moderation
Appointment Moderation allows any Listing Agent or Co-Listing Agent to be notified when an Owner or Occupant has cancelled or declined an appointment. This allows either agent to have the last say in whether or not the appointment should be cancelled or declined. This is useful as most appointments cancelled by the seller are because they might not be available during the requested time.
Contact Methods
Agents using ShowingTime for the MLS have many options available to be informed immediately of showing requests, confirmed appointments, and cancelled appointments.
- ShowingVoice (Automated Phone Call) **
Calls marked to be handled by ShowingVoice are made instantly, as are Email, Text Message, or Push Notifications. - Email
Email (Electronic Mail) was introduced in 1993 and is used as a base for most communications. - Text Message
Text Message, also known as SMS (Short Messaging Service), has been a vital communications tool since its introduction in 1992. ShowingTime for the MLS customers have two SMS methods available, as determined by their MLS. In both instances, notifications of an appointment's status are sent instantly. - 1-way SMS - These messages will only be used to inform you of an appointment's status.
- 2-way SMS ** - These messages can be replied to with either a 'Y' to confirm a showing, or 'N' to decline a showing.
- Push Notifications **
When you enable Push Notifications, you'll see showing requests, appointment statuses, and other messages related to showings or feedback in the top navigation bar of your smartphone so you are always up to date.
Contact Management

Can Confirm Appts By
This section allows you to configure each contact's notification preferences when appointments are scheduled so they can quickly confirm requests. These options will only be presented when the Appointment Required appointment type is selected.
Notify of Confirmed/Cancelled Appts By
This section allows you to configure any contact's notification preferences when appointments have been confirmed or cancelled.
Buttons


Management Buttons


Editing Contacts
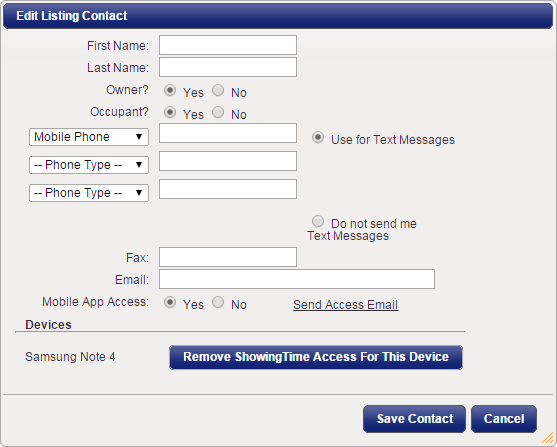
ShowingVoice calls contacts in the order their phone numbers are listed on this form.
Enabling & Disabling Text Messaging
Text Messaging options will only appear when a contact's phone type has been set to "Mobile Phone".
Enabling & Revoking ShowingTime App Access **
Mobile App access can only be provided to sellers or tenants if a valid email address is on file so the authentication process can be initiated. Once the seller or tenant has been authenticated (they'll get an email with authentication links), their devices will appear under the Devices section. Sellers & tenants are not restricted as to the number of devices that can be authenticated. If there are multiple contacts for a listing, it is recommended that each contact be listed separately. Then, activity logs for each contact will list actions taken to confirm, cancel, or decline appointments.
To revoke access to a specific device, click on the Remove ShowingTime Access For This Device button.
Access Types
For an agent to gain access into a home for a showing, ShowingTime needs to have access information on file. Access instructions will not be provided unless the buyer's agent has a confirmed appointment.
Access Types

Lockbox Serial #
Lockbox Location

Lockbox Serial #
Lockbox Location

Lockbox Serial #
Notes

Combination

Lockbox Location

Access Notes
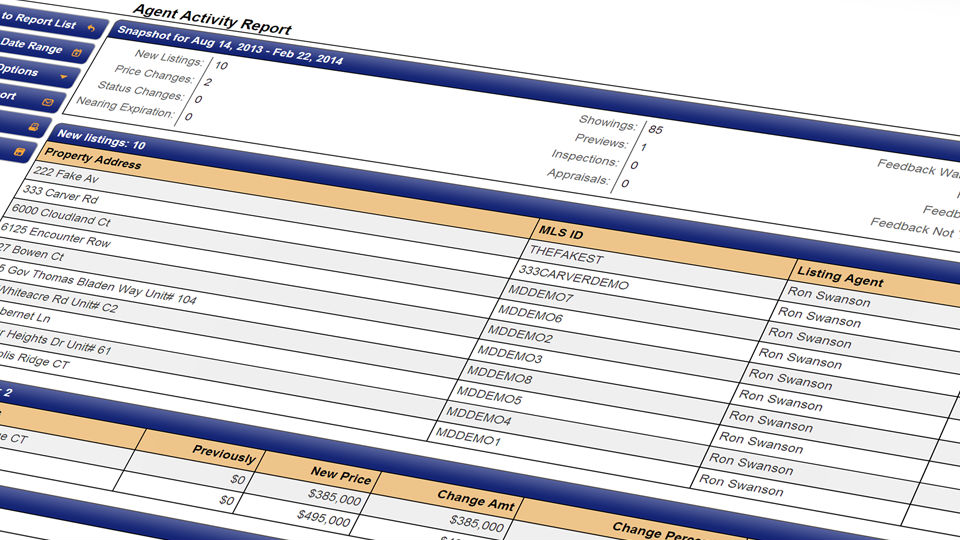
Agent Activity Report
Agents can view a summary of their activity in one report, including total new listings taken, price changes, status changes, total showings and listings nearing expiration. In addition, managers can monitor each agent’s activities by viewing their Agent Activity Reports.Getting Started

Step 1
Once you navigate to ShowingTime through your MLS, click on the Reports tab
Step 2
Select the Agent Activity Report

Step 3
By default, the results will show you activity from the current week, but this can be adjusted at the top up to a 30-day range followed by clicking Submit. You will then be able to review all of your agent activity within that time frame. From here you can:
- Adjust display options
- Email Report
- Print Report
- Download as a PDF
- Go back to Report List


